Tech Ed Tips
  • Blog
  • About
  • Contact

4 clicks to Show Video without Ads

9/19/2016

2 Comments

 
I am preparing for class tomorrow and am showing a video to compliment my digital citizenship lesson. While the video is appropriate I do not want the distraction and worry of ads that pop up next to the screen on YouTube.

There is a simple way to prevent this with as few as four clicks.

Click 1: Copy your URL
Click 2: Paste into this Website: https://safeshare.tv/
Click 3: Click Generate
Click 4: Submit.

You can now show the video from this screen ad free or you can download it to your computer.

Enjoy safe watching!

2 Comments

How to Make a collaborative Keynote

9/13/2016

4 Comments

 
Apple announced today that it is now possible to collaborate with others using their suite of tools. 

This is great for all those teachers who want to make a Keynote with other teachers for Back to School Night.

Here are the steps and a file to download of the steps at the bottom of the post
Picture

  1. Go to the iWorks url http://www.apple.com/iwork/
  2. Click ‘Start using iWork for iCloud”
  3. Click on the Keynote app
  4. You will be welcomed & taken to a “Getting Started Screen”
  5. ​Click “Create New” or “Use Keynote” and you will be taken to the select theme page​
  6. A new project will open once you click on a theme.
  7. Select the profile picture in the top right to add  collaborator(s). Click Continue.                                    
  8.  You will now see the option to send an email or send a link and to change the share settings. Your collaborators will need to set up an Apple ID account to open the document.
  9. Send to your collaborators and start your project. If working with multiple people and many slides, I would suggest assigning the slides to the the collaborators by placing their name on the slide.

howtomakeacollaborativekeynote.pdf
File Size: 349 kb
File Type: pdf
Download File

4 Comments

Two Ways to Edit PDFs in Google docs

8/31/2016

3 Comments

 
Today I had a couple of requests on how to edit a PDF. 

There a couple of ways to do this in Google Docs. One way allows you to write on top of the PDF but not touch the format. This is great when you need to fill in a form and then email it back to someone.

The second option allows you to edit the text of the PDF.  The good news, is you don't need to rewrite all the text! The bad news is
  1. It does not maintain the format. So if you have a table, it will become simple list. 
  2. It does not transfer images or graphics of any kind.

The work around for images is to simply take a screen shot or do a search for the image.

I attaching a quick screencast here to help walk you through the steps. 
3 Comments

Fun With Forms

2/29/2016

2 Comments

 
I love using Google Forms.  There are an untold number of uses for forms. When you make a Google Form it populates a spreadsheet (Google Sheet) with the responses. Making a form is easy and it allows you to keep all of your responses in one place. I can easily create  blog posts on each one of the ideas below, but just to give you an idea here are some of the fun ways you can get started using forms.

Ways I  like to use forms are:

  1. Feedback: Have students give peer to peer feedback by putting a project rubric in the form. Students then score and comment on each other’s work and I can send them their responses. Student’s are very candid with each other and offer good insight into each other’s work.
  2. Collect Assignments: Create a form and have students turn in the link to their Google Doc. This is an easy way to track who turned in an assignment and keeps your Drive clean!
  3. Exit Slip - a quick form with any of these is helpful
    1. I wish, I think, What if . .
    2. 3 Things I learned, 2 Things I want to know, 1 Question I still have
  4. Essay Starter, Understanding Texts and sharing evidence (see Slides below for examples)
  5. Reading Log
  6. Self-Grading quizzes! I love this feature for assessments!
  7. Check-in - How Are You Feeling Today?

I love Google forms and want to thank Jeffery Heil (@jheil65)  for permission of sharing his slide presentation “Game of Forms” and refer you to Alice Keeler (@alicekeeler) who has helped me learn a lot about forms and sheets with her blog posts.

To get started with forms and to find the form Templates in the “New Forms” go to “forms.google.com”  There are even pre-made templates you can use to get you started, such as, exit slips, assessments and worksheets. You can also customize the look of your form, by choosing a background color or creating your own header. See the image below to help you navigate. If you tried the “old” forms and want to run back to that version, look for the runner in the bottom left hand corner!


​​
​
Picture
Getting started with Google Forms
See Jeffery Heil's CUE 2015 Game of Forms Presentation below for some ideas on how to use Google Forms.
2 Comments

Image  Search and Usage Rights

1/13/2016

3 Comments

 
Picturesource: https://www.flickr.com/photos/audiolucistore/11046688556


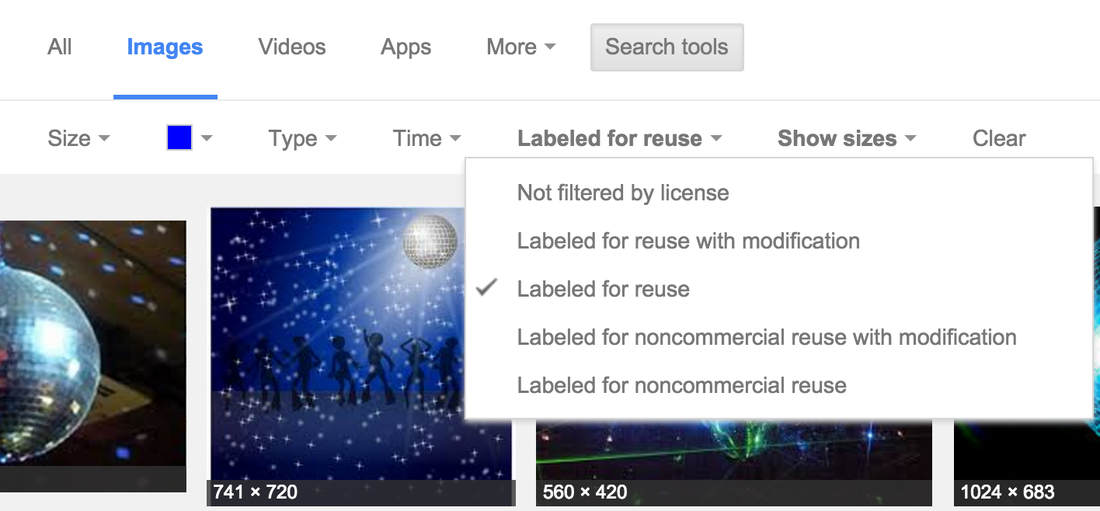
One of the great advantages of using  the internet is the ease of finding images for exactly what we need, when we need them. Google provides filtering techniques to simplify your search and the ability to check if you have the right to reuse or modify the image you have found.   


​One of the fun things you can do when you search for an image is to filter your search by color. I love to share this Google Slam that shows an older version of the Google search engine, but it gives you a good idea of what is possible. https://www.youtube.com/watch?v=UTO6X9vhzQM

The look of the search screen may be different, but the filters are essentially the same. It is easy to search by, size, color, type, time, usage rights and to choose to display the size of the images.

​

Picture
The usage rights drop down helps you find images that are licensed for reuse or not licensed at all. It is easy to see that in the search above, that the filter included blue disco ball images labeled for reuse.

Cite the Source!
It is important to always remember to cite the source of any image used, even if you have the right to reuse it.  The accepted format is to include the link for the image, below or nearby the image to allow a reader to go directly to the source of the image.

Keep a copy of this blog in the form of a Google doc, by downloading it below.
image_search_and_usage_rights.gdoc
File Size: 0 kb
File Type: gdoc
Download File

3 Comments

Tell All About it with Tellagami

1/12/2016

1 Comment

 
Picture
The Tellagami app (free or EDU) is a fun,  quick way for students to share what they know. One of the things I like about Tellagami is the ease of use and that it is so versatile.

What is it:

Tellagami allows the user to quickly and easily design an avatar (male or female), pick a background, and to either record themselves speaking or to use the text to speech function. The free version allows for 30 second recordings and the EDU version has a 90 second limit.


Picture
Picture

Why it is so powerful


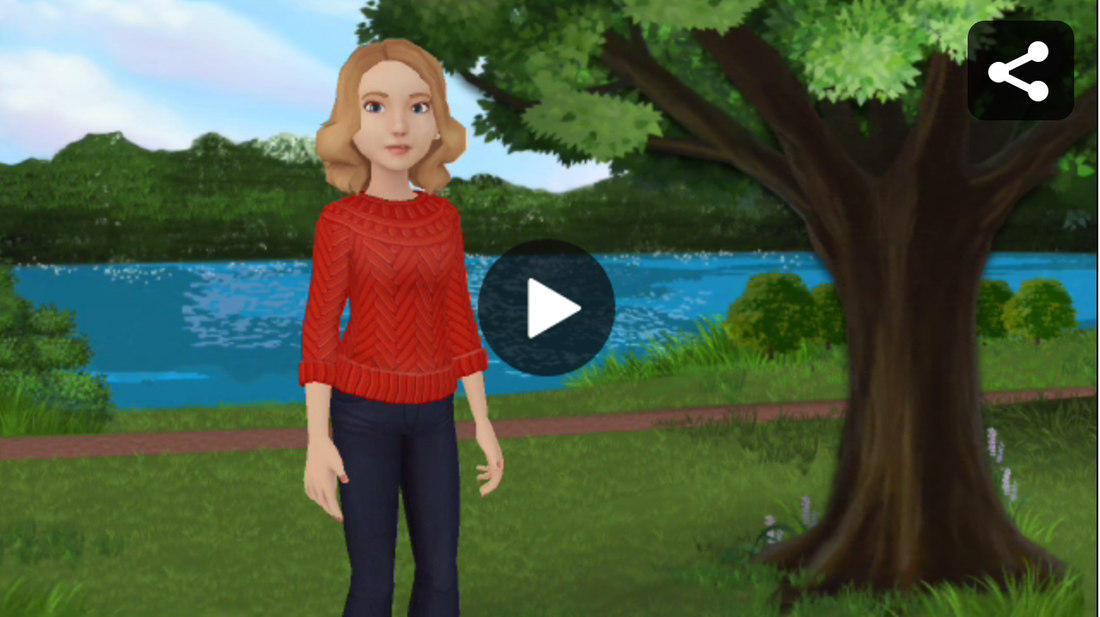
Students of all ages can easily use this app. As can be seen in the images above, by changing the background image an avatar can be placed in a setting and then share their knowledge of the topic. In the above example the student could be sharing information about child labor at the turn of the century.

​But there’s more . . .

One of the most powerful components is the ease of exporting the gamis (the end product)  to iMovie and stringing the clips together to make one movie. For example, students could make a report on a topic in Social Studies, such as child labor, by creating several gamis and putting them in iMovie they could easily create a narrated movie on their topic, here is an example using iMovie or click on the video below. What is so great about this concept is that students can focus on the content and not get bogged down in the editing of the movie. This example is a rough cut, but you can get the idea of what is possible.


What will you have students tell the world with Tellagami?


tell_all_about_it_with_tellagami.gdoc
File Size: 0 kb
File Type: gdoc
Download File


Uses
  • Demonstrating Knowledge on any topic under study - see Child Labor example above.
  • Practicing vocabulary in any LANGUAGE see this example -
  • Explaining how to something works
  • Narrating a story, here is an example
  • Describing a scene or picture - see the World War I Propaganda poster analysis example here.
  • Narrating a project they have made. Here are first graders describing animals that hibernate and their habitat.
  • Reporting - Animal reports  here is an example and here is another.
  • Biography - here is a president report and another one here that also uses another app called Yakit
  • A Shape Walk for younger students -here is an example
  • Explain a Science Concept -look here
  • Reading Fluency: example here

How to:
  1. Telegami- screencasts:
    1. 5 Mins of Tech: https://www.youtube.com/watch?v=2obuptInlQg
    2. With an Ausie Accent: https://www.youtube.com/watch?v=o4u53Z6K8i0
  2. App Smashing screencast: how to use a greenscreen w/Telagami: https://www.youtube.com/watch?v=uR3irxmj-w0


Sources for examples
http://www.craigbadura.com/2013/10/tellagami-in-classroom.html
http://ouripadclass.blogspot.com/2013/12/the-one-where-we-app-smash-our-reading.html
1 Comment

3 Steps to convert a PDf to an Editable Google Doc

11/30/2015

4 Comments

 
PictureConvert & Edit in 3 Steps
To begin, you need to get your PDF document into your Google Drive (see detailed blog post on this here). If you scan a document and it is saved on your desktop you can simply drag it over to your drive folder.
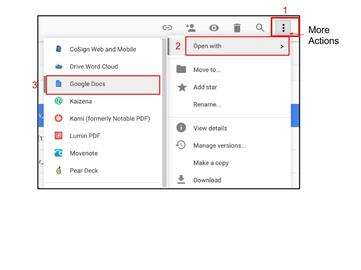
  1. In Drive select your PDF document and in the upper right hand corner click on the ‘More Actions’  button .
  2. Select “OPEN WITH”  a new window will open
  3. Select Google Docs .


Your window will now display an image of a doc icon and a dot that changes colors to show that the conversion process is happening. This may take a few minutes.


Important Notes and Considerations

Once your conversion is complete your document will open.

  • Two Files: The PDF is still in your drive and now there is a Google Doc by the same name. The icons will be different.

  • Images on Pages: The document will be divided by pages. At the top of each page is an image of the original document.

  • You can refer to the original image here to check the conversion process below (sometimes it is not perfect) make changes, fix layout and then delete the image by clicking on it and hitting the delete or backspace button on your keyboard.

  • Layout: The conversion will not retain layout options if the original is in a table or a special format. This is truly a bummer, but the text is all there and you can now format it as you choose.
howtoconvertapdfintoaneditablegoogledoc.pdf
File Size: 210 kb
File Type: pdf
Download File

4 Comments

Getting Smart with  Your Smartboard

10/28/2015

1 Comment

 
I am experimenting with my layout today and would love some feedback. I have embedded my blog document for a change, as well as, making it available for download below. If you would like a Google doc copy, you can click the link within the document. Let me know what you think of the new format. I am not sure I like the embedded document.
smartboaradtraining.docx__3_.pdf
File Size: 155 kb
File Type: pdf
Download File

1 Comment

Adding photos from your phone to your Weebly 

10/23/2015

32 Comments

 
Picture
,

Adding Photos taken on your phone to Your Weebly


We are are used to taking photos on our phones, why not update your website right from your phone? Here is how to get those photos that  are on your phone into your website in just a few easy steps!​


Picture
On the Weebly app (download it if you don't have it) - go to the left hand corner and the Home button
select “My sites” if you only have one site you will see your banner for your website. If you have more than one site you will see small thumbnails of each of your sites. Click on the site you want to open and edit
  • Click on the pencil icon to edit your site
  • Assuming you are adding photos to a gallery you already have started, select the picture in the gallery
  • select “edit”
  • select “manage images”
  • select “add images"
  • click on the images  you want-  a checkmark will indicate you have selected them.
  • click on ‘add images’
  • Don’t forget to publish!


click here for a Google doc of these directions
32 Comments

Protecting your Mac

10/4/2015

2 Comments


Passwords are important

It is hard sometimes to remember the rule to never share passwords. Recently, in order to help someone from a distance a password was shared, because a user was desperate and far from school. Unfortunately, this compassionate response turned into a security breach when the password was then shared again and the power of the password proved too tempting.  

It is a good reminder to us all to keep our passwords private and to make sure our devices are secure.  

We use Mac's and if you need to set a password on your device it is easy to do in just four simple steps. 

Our default setting is to leave the old password field blank, so faculty can easily set up their own passwords, which makes this evan easier. 

The four simple steps are below.


how_to_set_up_a_password_for_your_mac_in_4_easy_steps.docx
File Size: 723 kb
File Type: docx
Download File

2 Comments
<<Previous

    Archives

    September 2016
    August 2016
    February 2016
    January 2016
    November 2015
    October 2015
    September 2015
    August 2015
    June 2015
    May 2015
    May 2014

    Author

    I have been integrating technology in the classroom and across the curriculum for most of my career as a teacher. I hope this site helps you. Contact me with any special requests. 

    Picture

    Categories

    All
    Google Drive

    RSS Feed

Powered by Create your own unique website with customizable templates.
Photo used under Creative Commons from TechStage